CLICK HERE FOR FREE BLOG LAYOUTS, LINK BUTTONS AND MORE! »

My Pages

Wednesday, January 25, 2012

Computer Problems

Hi Friends,

I apologize greatly to both of the ladies that put on these wonderful hops that I signed up for and was unable to fulfill my obligation.  I know how much work goes into getting a hop to run smoothly and I feel just awful!  I had computer issues yesterday that I wasn't able to get fixed in time to put everything together.  Not to mention, I'm in another severe fibro flare and haven't been able to do much other than lie in bed. Today seems to be the most painful in a while.  I've been up on and off all night with body aches all over and the meds just aren't helping.  It gets very frustrating sometimes.   Not meaning to complain, just letting you all know what's going on.  I am so very sorry to my followers as well and to make it up to everyone I will do "make-up" projects and get them posted as soon as I am able to do so.  Thank you all for stopping by and for being so understanding.  

XO ~ Amy Jo

Wednesday, January 18, 2012

Tina's 30th Birthday Bash Blog Hop

craftyandgreen

*Please note, this is the post for day one.  Day two will be up late. but I am working on my very first video to go along with it so please, please come back in the afternoon or early evening.  I would so appreciate it! *  ~ Thanks for your patience. :0)

Good morning everyone and welcome to Tina's Big Birthday Bash!  I'm feeling a bit ill and am late in posting, but luckily this is a two day hop so my project will be up either later today or tomorrow for sure for everyone to see.  Happy happy birthday to Tina!  

If you arrived here from the awesome Shawnee from Blessed on the Bright Side then you are in the right spot!  If you just happened upon my blog then be sure to start at the beginning with the birthday girl herself at Crafty and Green.

I'm not gonna leave you all totally empty handed here so I'm posting a pic of another b-day card, but this is not the one that's for Tina.  The one for her will be up tomorrow.  This is one of the very first cards I did.  I'm sure you can tell. ;) LOL  I'm not even sure which cartridge I used... I think it was Sweet Treats.  I promise, tomorrow's card will be much better!  If you've seen this one before, I apologize.  I  started putting things in proper folders about 3 months or so after I started blogging (about a year ago). 


Alrighty!  Off you go then to the fabulous Nikki of Creations by Mommy.  Thanks for stopping by today and please come back tomorrow!

XO ~ Amy Jo

Monday, January 16, 2012

FCCB Snow Fun #94

Hi Friends,

It's another Fantabulous Challenge me Monday at FCCB!  This week's project is "Snow Fun".  Please join us for this challenge!  You need to use either a snowflake or a snowman on your project, along with at least one Cricut cut!  Easy peasy, right? :)

We have an awesome sponsor this week that provided some of our DT with product to work with. I thought that EAD only sold vinyl words and sentiments for your walls, but boy was I wrong!  They have a fantastic selection of stickers and other super fun scrapbooking and card making products!  I found lots of goodies that I want and I'm sure you will too.  Oh, and their prices are very affordable, which adds to the fabulousness of EAD!
E.A.D. Designs
For my project today I used the MS Holiday Cakes cartridge, Mr. Frosty (printed paper on the Imagine), and Wild Card.


The snowman and all the lovely snowflakes are E.A.D. stickers.  I used pearls from Creative Charms and from CTMH.  The snowglobe stamp is from Flourishes.

Please pop over to FCCB and see the rest of the team's awesome creations and to enter the challenge, yourself!  Thanks for stopping in today!  Please scroll down for my first post of the day.  This is post 2/2.

XO ~ Amy Jo

Twine-ology


Hi Fabby Friends!  I am so excited!  I just had to share this with you... There was a naming contest from Twine-ology by Timeless Twine for two of their awesome new colors and I decided to give it a shot.  I really didn't think I would get picked, but I did get picked for one of the colors!  Yay!  So please check out this awesome site and their new "Strawberry Truffle" (the one I named) gorgeous twine that is now available for sale at Bella Creationz!  They also have the lovely new "Aqua Delight" for sale too.  I will be picking up some of that very soon, but for naming the Strawberry Truffle, I am getting a free roll!  So very stoked!  They have lots of other fun stuff in their store too.  I just checked it out and looks like it's time to go shopping again! ;)
Thanks for checking in with me today.  Hope you all have a great Monday!

XO ~ Amy Jo

Sunday, January 15, 2012

Valentine's Day Blog Hop Day 2

*I am in FOUR blog hops this weekend!  Please check them all out.*

For the Based on a Book Blog Hop click HERE.
For the Four-Legged Friends Blog Hop click HERE.
For the Valentine's Card Blog Hop for Kids with Cancer click HERE.


Good Morning Friends and welcome to the Valentine's Day Blog Hop hosted by Nicolette of Beyond Scrapin'.  This is Day 2 of 2. You should have arrived here from Playing with Paper.  If you just happened upon my blog today, please be sure to start with Nicolette as there will be great projects and blog candy along the way!  I am offering blog candy as well.  Please leave a comment and become a follower.  You must be a follower to win!  I will be picking one random name from the combined blog hops today so be sure to leave a comment on each of my hops for an extra chance to win!  I will be giving away a surprise bag of scrapping goodies. :)

As you can see, this hop is all about Valentine's Day!  I have a few Valentine's cards to post that I created last year or the year before.  I apologize if I've posted them before, but so many of you are new since then that I figured most of you won't have seen them anyways.  Hope you enjoy! :)

Please click on each picture for a larger view and all the details.  These were made from foam kits I got at the $1 store last year and were sent to my MIL to use for the grandkids.  I can't believe how cute they turned out, but I added a lot of detail to make them much more fancy. ;)

 I put the cupcake together, added some random foam hearts and then added Stickles and used my Zig pens for faux stitching around the hearts on top.
 First I decided to thread the white heart with ribbon (love the way that turned out), then I decided to use my Zig pens and totally dress up the foam rose and added it to the white heart.  I put on a few red foam hearts and adhered the whole white heart to the big red heart and there ya have it!

For this one I outlined the letters with a Zig pen and added a little doodled heart to the "B".  I then added the bees and used Stickles on them and my Zig pen for faux stitching.  I outlined the "Mine" with my Stickles as well.  Super simple and so sweet!

Anytime you see these little foam kits, I recommend purchasing them and putting them together with your own touches for kids.  They love them!  


Thanks so much for joining us this weekend!  Don't forget to leave a comment and become a follower to be entered in the drawing for my blog candy.  I am the final stop on this hop.

XO ~ Amy Jo


Saturday, January 14, 2012

Based on a Book Blog Hop

*I am in FOUR blog hops today!  Be sure to catch them all!*

For the Four-Legged Friends Blog Hop click HERE.
For the Valentine Cards for Kids with Cancer Blog Hop click HERE.
For the Valentine's Day Blog Hop click HERE.


Good Morning Crafty Friends and welcome to the Based on a Book Blog Hop hosted by Tanya! Ashley of Marine Wife's Scrappin' Life is the first stop today.  You should have arrived here from Memories in Tyme.  If you just happened upon my blog today, please be sure to start with Ashley to catch all the awesome creations and blog candy along the way!  I will be having blog candy as well, but you must leave a comment and be/become a follower.  Only my followers get candy! ;)  I will be drawing one name from all of my hops so leave a comment on each and you will be entered to win four times!  I will be giving away a bag of scrapping goodies to one lucky follower. 

Thanks so much for hopping along with us today.  I was so excited when I saw this hop came up and I just had to participate!  I love reading (it's one of my favorite pastimes) and had the perfect stuff in my stash to use for my very favorite book ever, Wicked by Gregory Maguire!  I love this spin off of the Wizard of Oz and of course I love the classic Wizard of Oz, so I kind of combined them here with this piece of "altered art".  Lots of times I like to make "art" for my house rather than a layout or a card and since there were so many elements that I wanted to add here, I just had to do that instead!  So, we're doing two books in one!

This one is VERY picture heavy and I apologize for that, but I added so many elements to this, that I wanted you to see them all from every angle possible! I had sooooo much fun working on this one and am quite proud of how it turned out.  If any one is interested in buying it, please do let me know.  I have enough stock so I can create another for myself if anyone likes it enough to buy it. :)  I would be so thrilled!   Anyways, onto the pictures!  Oooh, I just hope you all like this one as much as I do!  It's 3:30 in the morning and I just got it done! LOL  Phew! ;)  I will be listing some details in the captions and some at the end.  I won't bore you with the deets of the ink and adhesive, gems, etc. I used, but if you have questions, please do ask! Oh, and please click on the pictures to see them all in greater detail and larger size.  It's hard to see all the cool stuff w/o clicking on them.

 12x12" Paper from Recollections - Midnight Magic (amazing Halloween paper pack if you can still find it).
 Right-hand corner - semi/closeup 
 To create this part I folded down a corner of the background paper and inked it a bit with black ink.  I took a length of Doodlebug Blk/White twine and wrapped it around the corner, glued it down a bit, then tied it into a bow.  I stapled the corner down.  Then, I used a circle punch to cut out a compass from the Graphic 45 (G45) - Magic of Oz Collection (8x8" Paper Pack) and adhered it to a bubble epoxy sticker (so it's rounded on top, not flat).  Next I added a triangle of printed paper from Authentique and another triangle layer of Bazzill textured cardstock.  I just love the way this corner turned out!
 For the upper left side of the page I took a sheet of the G45 paper (mentioned above) and cut out the "cards".  I used my new favorite tool, the Tim Holtz Scraping Tool to distress the edges and make them curl nicely like book pages (which wasn't my original intent, but it made perfect sense after putting a few of them down on the page!)  So the Magic of Oz is actually on top of the Lion and you can open it a bit to see it better.  I added pop dots to some of them.  The Scraping Tool really did a great job distressing these just how I wanted.  It's like $5.00 and you can buy it pretty much anywhere.  My understanding is it's fairly new.
 This element is from the G45 stack and it is on a page of four cut-outs.  This witch is PERFECT for the Wizard of Oz or for Wicked.  I added some green rhinestones to the corners.
 The green cardstock element is a journaling square cut from Bella Blvd. - Too Cute to Spook (#333 Cute Cuts).  I stamped it with the Wicked stamp set by G45, then the hat and sentiment are from CTMH.  I actually won the "Wicked" set (how ironic is that?) from Scrapbooking KampStyle from a previous blog hop. It's a fantastic set and I love it very much! :)  I added a cut out of the word "Wicked" from the G45 paper.  Next to the green journal blog is a little square with the compass that I cut out from that same paper piece and I added a little silver brad to it so now it spins!
 Had to have the flying monkeys right?  Cut out from G45 paper.
 Isn't this guy so cool?  I used that same Authentique
 Definitely click the pic on this one and zoom in.  It's a full sheet of the G45 paper and it has lots of fun "advertisements" on it.  You'll love it!
 I added a button to the top of the 8x8 sheet to bring a little more attention to the top.

This has to be my very favorite part!  I took a piece of cut-out plain chipboard from Stampin' Up and painted it with FolkArt #6711 Metallic Peridot acrylic paint (from Joann's or Michael's).  It's such a great color.  I would recommend getting this for your paint stash. I use it for lots of things.  Then I took the coolest stamp EVER (in my opinion) from Stampendous - Bootiful Boots set, (that I bought at Archiver's) and inked it onto the chipboard with Staz-On to make sure it would be permanent.  I totally dig how it turned out.  I added some gems to the shoes and over to the side is a little popped up cut-out from the 8x8" main page that I wanted to stand out a bit cause I thought it was cute.

Alright Ladies and Gents!  There you have it!  Sorry that was such a super long post, but there was a lot of detail there that I wanted to share with you.  Don't forget to become a follower and leave a comment for a chance to win some goodies!

Now you're off to see Ashley, the Wonderful Ashley of Made Especially for You!  ;0)  Ok, so the song doesn't quite work there, but hey... I gave it a try!  I know she'll have something magical for you today! 

XO ~ Amy Jo


Valentine's Day Blog Hop

*I am in FOUR blog hops today!  Please check them all out.*

For the Based on a Book Blog Hop click HERE.
For the Four-Legged Friends Blog Hop click HERE.
For the Valentine's Card Blog Hop for Kids with Cancer click HERE.


Good Morning Friends and welcome to the Valentine's Day Blog Hop hosted by Nicolette of Beyond Scrapin'.  This is Day 1 of 2. You should have arrived here from Playing with Paper.  If you just happened upon my blog today, please be sure to start with Nicolette as there will be great projects and blog candy along the way!  I am offering blog candy as well.  Please leave a comment and become a follower.  You must be a follower to win!  I will be picking one random name from the combined blog hops today so be sure to leave a comment on each of my hops for an extra chance to win!  I will be giving away a surprise bag of scrapping goodies. :)

As you can see, this hop is all about Valentine's Day!  I have a few Valentine's cards to post that I created last year or the year before.  I apologize if I've posted them before, but so many of you are new since then that I figured most of you won't have seen them anyways.  Hope you enjoy! :)

 This card was made with pink Bazzill cardstock, red stash cardstock, patterned paper from a 4x6 paper pack (Le Creme?), and a Valentine from Fancy Pants.  I used a stamp from the Love Always & Be Mine sets by Pink by Design.
 This one is created with the same materials, but I embossed the pink cardstock.

 Closeup of the embossing from the Cuttlebug Swirls folder.
This is the inside.  The sticker is part of the Fancy Pants line as well.

Thanks so much for joining us today!  Don't forget to leave a comment and become a follower to be entered in the drawing for my blog candy.  I am the final stop, but be sure to come back tomorrow for some different projects!

XO ~ Amy Jo


Four Legged Friends Blog Hop

*I am in FOUR blog hops today!  Be sure to check them all out!*

For the Based on a Book Blog Hop click HERE.
For the Valentine Cards for Kids w/Cancer Blog Hop click HERE.
For the Valentine's Day Blog Hop click HERE.

Hi Everyone!  Thanks so much for joining us today for the Four-Legged Friends Blog Hop hosted by boy-wonder, Tanner of Mr. Cricut Crazy.  If you don't know who he is, you're gonna be amazed!  He is a talented young man with an awesome line of stamps that you can't find anywhere else!  Lots of his stamps are created for people who love pets, dogs especially, which is why this is a perfect hop for animal lovers of all sorts (like me)!  If you arrived here by chance, please start back at the beginning with Tanner's blog (link above).  If you arrived here from Tammy of The Purple Muse, then you are in the right spot!  I will be giving blog candy to one lucky person who leaves a comment becomes or is a follower.  Please comment on the other hops I'm in today for extra chances to win!  I will be giving away a goody bag of scrapping candy. :)

For today's project I have created a card special ordered by a friend of mine for her mother's b-day.  Her mom has a ShihTzu and I thought this would be perfect for her! I got the SVG file free online and I can't remember where from. :(  If the designer happens upon my site, please leave your info here in a comment so I can give proper credit.  It's just adorable!


I had fun making this one.  I used my Cricut Expression to cut all the layers on cardstock from my stash.  The card itself is from Recollections cardstock.  I added detail with my Zig pens and a white gelly roller, along with Colorbox ink.  The inside is stamped on the left with a $1 stamp from Michael's and a "Happy Birthday" stamp from Stampin' Up.  I added twine from My Craft Spot.  The "Mom" stickers are from my stash as well.  I outlined them to make them pop a bit and then faux stitched the edges of the card after rounding them with a corner rounder.  I used my ATG, and pop dots, along with Tombow clear adhesive for this project.


I am your last stop today.  Thanks so much for joining us in this hop today!  Hope you had as much fun as I did! :)  Don't forget to become a follower and leave a comment to enter for blog candy!

XO ~ Amy Jo

Valentine Card Blog Hop for Kids with Cancer Blog Hop

*I am in FOUR blog hops this weekend!  Be sure to check them all out!*

For the Based on a Book Blog Hop click HERE.
For the Four-Legged Friends Blog Hop click HERE.
For the Valentine's Day Blog Hop click HERE.


Good morning everyone and welcome to the Valentine Card Blog Hop for Kids with Cancer Blog Hop!  Can  anyone think of a better reason for a blog hop?  I sure can't!  I'm so glad to be participating in a hop for a great cause.  Myself, and all of the other talented, lovely ladies on this hop will be donating our cards to kids with Cancer.  

Liz with Decade of Scrap has decided to put on this hop to bring some joy to children battling this awful illness.  She has Leukemia and knows what it's like to go through the pain and suffering of Cancer.  I have been touched by Cancer in so many ways.  My mom had Breast Cancer twice.  My dad passed away from Stomach Cancer.  My grandma died of Cancer.  Two of three uncles passed away from Cancer (my dad's brothers).  So as you can see, this is a cause that hits a little too close to home for me.  Thank you Liz, for reminding us of others out there who need people to keep them going and keep them fighting!

If you have arrived here from Melissa of Timeweavers, then you are in the right spot.  If you just happened upon my blog today, please start at the beginning with Liz as we do have some great talent and sponsors for prizes in this hop!  I am the last stop in the hop today and I am offering a little blog candy as well.  Just be sure to leave a comment and please become a follower.  You must be a follower to win.  I will be drawing one person from all four hops to win a little goody bag from me. :)

Alright Friends, onto my project for this hop!  I just made a super quick, but very perfect for kids, Valentine.
 The owl part slides out from under the ribbon and opens to (see below)...
 Isn't that cute?  I just came up with the idea in literally one minute... I have these great little cut-outs and wanted to do something simple.  This is the inside and you can write a little note on the blue panel, as well as on the back-side (not pictured).
 Ribbon
Closeup of writing space.

If you are interested in the details, read on.  If not skip to the bottom, but don't forget to leave a comment and become a follower for blog candy!


I used a cutout from a 12x12 sheet of Fancy Pants paper from last year's line.  There are a total of 12 adorable valentines that you can actually just cut  out and use if you want or you can add to them, like I did.  I got an idea to use this, without compromising the back of the Valentine and decided to just crease it with my MS Score Board and adhere it to a piece of blue card stock.  To make sure it stays on there I added an eyelet by using my Crop-a-Dile.  Of course I inked all my edges first!  I added a little border strip from Fancy Pants to the inside, along with some stamped hearts from Pink By Design.  The blue ink is a Colorbox Cat's Eye pad of course! ;)  I just love those and have them in lots of colors.  Then I decided to add some printed ribbon to cover the To/From part of the Valentine because I'm not sure of the name of the child that will receive this.  I wanted to make sure the Valentine didn't just flop open so I created a loose ribbon (Celebrate It from Michael's) slide for it to slip under.  I used my ATG to adhere it, and am going to add another piece of cardstock to the back to cover that up and to be able to make my message a little longer.  I plan on making several more of these to send and I'll post the pics next time I need a Valentine's project. :)

This is your last stop on the hop.  Thanks so much for joining us today!

XO ~ Amy Jo


Friday, January 13, 2012

My First Guest Design Spot

Hi there! I am so excited that Tina from Crafty and Green has been kind enough to have me as a Guest Designer!  This is my very first Guest Design spot!  I would love it if you would swing by her site to catch my post over there and leave a comment either here or there, or both, please!  We would love to hear from you.  I have sent her some bio info about myself that some of you may not be aware of so it might be fun for you to check that out and also she's having lots of super fun things going on right now on her blog.


I have listed my project in great detail here, and I warn you, it's quite a long explanation of actually creating the card.  If you skip through and just check out the pics, I won't mind. ;)


For today’s project, I have used Tina’s sketch and theme (music) for January as my inspiration.  I chose to do a card and yes, it will be up for sale in my store soon!  I have a few pictures here for you all to see the details.  The details on how I made the card are below…


1 Front of Card - Inside is Blank (for now)
2 Closeup of Bird Stamped on Chipboard and Crinkle Ribbon

3 Closeup of Sentiment, Punched Edge, and Popped Flower with Note
4Closeup of stamped background paper and popped flower

First off I cut a white piece of Recollections card stock down to 10”x7”, scoring it with my Martha Stewart Score Board to make the fold at 5”, making the finished card 5”x7”. 


Next I cut down a piece of polka dot patterned paper from my stash, rounded the corners with a corner rounder and inked the edges with a Colorbox Cat’s Eye – Dark Brown ink pad. I adhered it to the white card stock with my ATG.

After that, I cut down a piece of plain coordinating yellow paper and stamped the background with Stampin’ Up – Summer Sun ink, then again with Stampin’ Up More Mustard ink, using a stamp that I won as blog candy by Stampendous – Cling Music Score (again, sticking with our music theme here).  I punched one edge of that same paper with a Fiskars punch (which broke after I did that one edge and that is why both edges were not identical L) and finished by inking all the edges again with the Colorbox Ink. I actually liked the way it looked with only one edge punched.  It made it unique. J  Then, I adhered it to the patterned paper with my ATG. 


Next up, I fussy cut six flowers from that same paper line in my stash (it’s a generic brand) and cut out the center circles with an X-acto. I then used my 1” punch and cut out six more flowers with it to layer under the flower borders with the circles cut out so the yellow background would not show through and to add a little more texture.  I inked all my edges of the circles and the flowers and put them together by first running them through my Xyron and then layering -- 1.) 1” flower circle 2.) fussy cut flower border 3.) stamped the remaining flower circle centers with black pigment ink, a note stamp from Fiskars, and used Stickles, a Zig pen, and a white gelly roller to make them really defined 4.)  put a pop dot on the back of the note-stamped centers and went around the pop dot edges with my black Zig marker so if you look at the side it won’t be so noticeable – great trick btw ;), then added them up and to the side a little of the flowers that were already pasted down to create a bit of a shadow.  Notice the flower centers on the bottom layer are a different color than the pop dotted ones. 

The next step I did was to add a gorgeous piece of 3 Girls Jam ribbon in Goblin Green, which I had also won as blog candy!  I decided to leave it wrinkled and to make it stay that way I first put down a line of ATG adhesive, then kind of smooshed the ribbon on top of that.


To stick with the music theme I found this perfect little bird stamp (notice he’s singing) J from Inkadinkado, to go with my music notes.  I found a great chipboard embellishment from my stash and decided to ink him on to it by using StazOn ink.  Since the pattern still came through I wanted to color my bird in so I used Pearl Ranger Ink to color him in.  I then took my orange Zig marker to add some color to the beak and music note, and finished off by adding some more white detail with my white gelly roller.  I then glued down the embellishment with Tombow liquid adhesive and outlined around the embellishment with my black Zig pen to make it “pop”.

Finally, I added some Palette glue from a glue pad to the yellow part of the card and sprinkled all over with Holiday Glitter in blue that I also won as blog candy and then I added the cute sentiment which was from the same stamp set.

There you have it!  I’m sorry for the super long instructions, but as simple as this card looks, there were a lot of steps involved to create it!  


Thanks so much for joining us today and I really hope you’ll pop over to my personal blog to become a friend and follower.  Thanks again to Tinaeco-friendly.  She's the kind of gal I'm proud to call my friend!

XO ~ Amy Jo   

Monday, January 9, 2012

Challenge Me Monday #93 Man Time

Hello awesome friends!  I have a project for FCCB today, so generously sponsored by Boys Rule.  OMG, our sponsor was amazing!  So super generous!  Thank you so much to their awesome company for providing us with this great product.  Ladies, please check out their website.  They offer really amazing kits!  I will have a few more projects coming up for you, but here is the first.

I used papers from the October Big Boy Kit along with that awesome spinner sticker in the middle, which I added to 2 different "cupcake" layers from the Martha Stewart Crafts Birthday Cake Art to make it really pop.  I cut up the cool flag paper that was included and inked it to make a border.  Then I added a few separate flags to finish off the card.  I left it blank so whomever purchases it (it'll be for sale in my store soon) can make it whatever type of card they like, ie. congratulations, happy b-day, etc.

Thanks for joining me today and please join us at FCCB for our challenge this week and to check out the other creations by our awesome design team!

XO ~ Amy Jo

Saturday, January 7, 2012

Snow Days Blog Hop - Day 2 of 2


Welcome to the Snow Days Blog Hop!!  This is day two of two.  If you missed yesterday's post, please scroll down one post. :)

We're so happy you could join us for this super-fun hop showcasing cards, layouts and projects that feature everything about Snow Days!! You'll find an array of ideas throughout the hop -- We hope you'll enjoy each and every project along the way!!

If you'd like to join our Snow Days Fun, then you are in the right place. Keep alert for blog candy along the way as some hop stops will be offering some goodies...

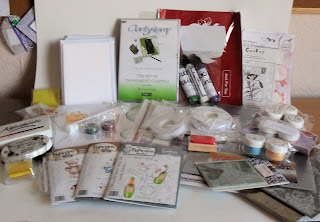
For the hop today, I've created a cute winter card with a figure skating theme.  I have a friend who is a figure skater and every year I make her a card with a figure skate (which, by the way, are not that easy to find)! I have never been ice skating, but my friend says it's the most beautiful when you're out there on the ice and it starts to snow.  We have a gorgeous little rink downtown that is open to the public at night and it is like looking into an amazing snow-globe when it's dark out, snowing, the Christmas lights are everywhere and people are skating.  Such a gorgeous scene.  Anyways, about the card I made... LOL...  I used my Cricut (not sure which cartridge, but can look it up if anyone needs to know.)  For the background of the card I used some shiny blue paper from Recollections (Michaels), I used glossy snowflake paper from my stash, and the rest of the cardstock was from Recollections except for the mirrored silver for the blade.  I'm not sure where that came from, but I'm happy I had it on hand because I can't think of anything more perfect for the blade. :) I used my Spellbinders dies for the first time, however, I just did the cut, not the embossing because I hadn't figured it out at that time! LOL  I got it down now though. ;)  The cute Merry Christmas stamp is from Stampin' Up and I believe the snowflake stamp is too.  I used Staz-On ink for this because I stamped on the shiny blue paper and wanted to make sure it wouldn't smear.  I added a little hand-doodled flourish too.  The outside edges of the Spellbinders shapes were inked and then I added a cute little mitten charm with some silver floss.  There is a closeup below...  For the skate, I did a few layers on the Cricut and added some pop dots.  I then did some faux stitching with my Zig pen and outlined the cut parts with a metallic silver Creative Memories pen, which I think really made the skate look a lot more interesting.  I also added some flocking to the top of the skate to make it fuzzy.  It's hard to see here, but maybe you will see it better on the closeup below.  Last but not least, I added a silver/blue ribbon from Michael's.


 Here's a closeup of all the detail on the skate.  The top is fuzzy!
Isn't that the cutest little mitten charm?

Thank you again for checking out my project... Now hop on over to Mickie!

Here's a list of the entire hop, in case you get lost along the way or want to revisit anyone:

Lisa P - http://handmadewithlove-lisa.blogspot.com/ You are here!!!
Bonnie - http://scrap-n-away.blogspot.com/ You go here next!!!
Sherry -http://www.upordowntheyrebeautiful.blogspot.com/
Doris - http://mybugandmecreate.blogspot.com/
Theresa D: http://scrappinginheels.blogspot.com/
Beckie http://justbcreativecrazy.blogspot.com/
Erin - http://deeplyrootedlife.blogspot.com/
Amy - http://www.lovetocrop.com/
Eva - http://evasscrapsncards.blogspot.com/
Cathie-http://cathiescafe/-scraphappy.blogspot.com/
Ashley - http://especiallymade.blogspot.com/
Lisa G - http://www.bljgraves.blogspot.com/
Melissa - http://timeweavers.wordpress.com/
Kristen - http://fantabulouslypink.blogspot.com/
Theresa - http://scrappyartcrafters.blogspot.com/
anita- http://www.anitaandbugs.blogspot.com/
Lynne - http://slasewcraftiness.blogspot.com/
Barbara B. http://barbarab3.blogspot.com/
Amy Jo - http://lv2scrapandfibrofacts.blogspot.com/
Mickie - http://www.littlescrapcorner.blogspot.com/
Janet Royer- http://janetscreativieworld.blogspot.com/

Thanks for stopping by!  So happy you joined our hop. :)